Custom ViewController Transitions with Animation in Swift4
This blog about UIViewController transition for dismissing and how to them interaction.
This blog used for a pop transition of UIViewcontroller with Animation using CollectionView and PanGesture. First of all, Create New Project and open main.storyboard select UIViewController and add UICollectionView in UIViewController or select CollectionViewController.
Step - 1 : all images display using UICollectionView.

Now select UICollectionView and give Top, Left, Right, and Bottom constraint. Create one ViewController.swift file and create a connection with UICollectionView using IBOutlet.
@IBOutlet weak var cvSelectedCollection: UICollectionView!
Now create one UICollectionViewCell.swift file and select UICollectionViewCell and select UICollectionViewCell.swift file using identity inspector. Now open attribute inspector and set cell identifier. Add UIImageView in UICollectionviewCell and a connect with CollectionViewCell.swift file using IBOutlet.
@IBOutlet weak var imgCollection: UIImageView!
Now open ViewController.swift file and add UICollectionview code. Add UICollectionViewDelegate, UICollectionViewDataSource, UICollectionViewDelegateFlowLayout in ViewController.swift file and add below line of code.
class DisplayDetailsViewController: UIViewController,UICollectionViewDelegate,UICollectionViewDataSource,UICollectionViewDelegateFlowLayout
{
     var arrCollection : String = ["image1","image2","image3"]

    override func viewDidLoad()
    {
            super.viewDidLoad()
            cvSelectedCollection.dataSource = self
            cvSelectedCollection.delegate = self
    }

    func collectionView(_ collectionView: UICollectionView, numberOfItemsInSection section: Int) -> Int
    {
            return arrCollection.count
    }
    func collectionView(_ collectionView: UICollectionView, cellForItemAt indexPath: IndexPath) -> UICollectionViewCell
    {
                let cell : UICollectionViewCell = collectionView.dequeueReusableCell(withReuseIdentifier: "cell", for: indexPath as IndexPath) as! UICollectionViewCell
               cell.imgCollection.image = UIImage(named: "\(arrCollection[indexPath.item])")
               return cell
    }

    func collectionView(_ collectionView: UICollectionView, layout collectionViewLayout: UICollectionViewLayout, sizeForItemAt indexPath: IndexPath) -> CGSize
    {
           var witdhOfCell = CGFloat()
           var heightOfCell = CGFloat()
            let imgSize = UIImage(named: "\(arrCollection[indexPath.row])")?.size
            if indexPath.item == 0
            {
                witdhOfCell = (SCREEN_WIDTH ) - 16
                heightOfCell = 360
            }
            else
            {
                if Float((imgSize?.width)!) > Float((imgSize?.height)!)
                {
                    witdhOfCell = (SCREEN_WIDTH / 2) - 16
                    heightOfCell = (SCREEN_WIDTH * 80) / 165
                }
                else
                {
                    witdhOfCell = (SCREEN_WIDTH / 2) - 16
                    heightOfCell = (SCREEN_WIDTH * 80) / 120
                }
            }
            return CGSize(width: witdhOfCell, height: heightOfCell)
}
Using UICollectionViewLayout method set and manage CollectionViewCell layout. Here SCEEN_WIDTH constant variable store UIScreen width.
let SCREEN_HEIGHT: CGFloat = UIScreen.main.bounds.size.height
let SCREEN_WIDTH: CGFloat = UIScreen.main.bounds.size.width
Above code only for data display using collection view and now apply back animation using UIView and UIImageView.
Step - 2 : set UIView and UIImageView for Animation

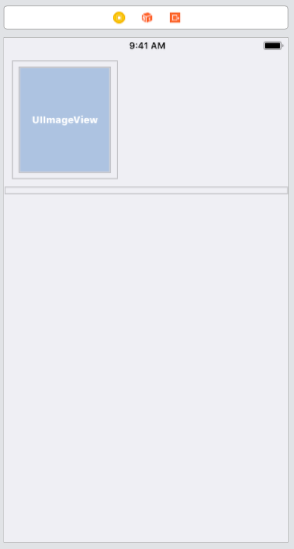
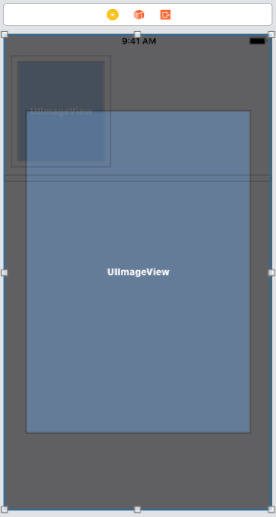
Now select UIView and set in UIViewController with Top, Left, Right, and Bottom constraint according to the above screenshot. Add UIImageView in UIView according to the above screenshot. UIView and UIImageView connect with ViewController.swift file using IBOutlet.
@IBOutlet weak var vwBackground: UIView!
@IBOutlet weak var imgSelected: UIImageView!
var isBack = false

override func viewDidLoad()
{
        super.viewDidLoad()
        cvSelectedCollection.dataSource = self
        cvSelectedCollection.delegate = self
 	    vwBackground.isHidden = true
}
Now add PanGesture in CollectionView cellForItemAt indexpath function. And add UIGestureRecognizerDelegate with other delegates.
func collectionView(_ collectionView: UICollectionView, cellForItemAt indexPath: IndexPath) -> UICollectionViewCell
   {
 			let cell : UICollectionViewCell = collectionView.dequeueReusableCell(withReuseIdentifier: "cell", for: indexPath as IndexPath) as! UICollectionViewCell
         	cell.imgCollection.image = UIImage(named:"\(arrCollection[indexPath.item])")

 			let panGesture = UIPanGestureRecognizer(target: self, action: #selector(self.handlePanGesture(_:)))
            cell.imgCollection.isUserInteractionEnabled = true
            cell.imgCollection.addGestureRecognizer(panGesture)
            return cell
}
After adding PanGesture in CollectionViewCell’s UIImageView create handlePanGesture(_:) function for handle all pangesture state and perform a different action in every different pangesture state.
@objc func handlePanGesture(_ panGesture: UIPanGestureRecognizer)
 {
        self.view.bringSubviewToFront(imgSelected)
        let translation = panGesture.translation(in: self.view)
        if translation.y > 0
        {
            self.isBack = true
            imgSelected.center = CGPoint(x: imgSelected.center.x + translation.x, y: imgSelected.center.y + translation.y)
        }

        panGesture.setTranslation(CGPoint.zero, in: self.view)
        if panGesture.state == UIGestureRecognizer.State.ended
        {
            if isBack
            {
                self.navigationController?.isNavigationBarHidden = false
				self.navigationController?.popViewController(animated: true)
            }
        }
        if panGesture.state == UIGestureRecognizer.State.changed
        {
            if isBack
            {
                imgSelected.image = UIImage(named: "\(strSelcted)")
                setView(view: vwBackground, hidden: false)
            }
        }
        else
        {
            setView(view: vwBackground, hidden: true)
        }
    }

    func setView(view: UIView, hidden: Bool)
    {
        UIView.transition(with: view, duration: 1, options: .transitionCrossDissolve, animations:
        {
            view.isHidden = hidden
        })
    }
Here func setView(view: UIView, hidden: Bool) used for UIView hide or unhide with duration and animation.
Contact us; If you have any query regarding iOS Application / Apple Watch Application / iMessage Extension / Today’s Extension OR you have your own application idea let us know. We have expert iOS team for your help.


