Create Xcode project
Xcode is an Integrated Development Environment, for making iPhone Application Development, iPad Application Development, watchOS Development.
Just follow below step for creating Xcode Project.
Step 1: Opening screen

opening screen displays Xcode version and 3 options.
- Open with playground: You can use playgrounds in Xcode to quickly write some Swift code, experiment with the new syntax. Most of all playgrounds in Xcode are a great way to learn Swift programming.
- Create a new Xcode project: This option is used to create a new project for any iOS Application.
- Clone an existing project : This option is used to clone already existing project in Xcode Editor, which project is uploaded on GitHub repository or bitbucket repository.
Now click on “create a new Xcode project”.
Step 2: Template screen

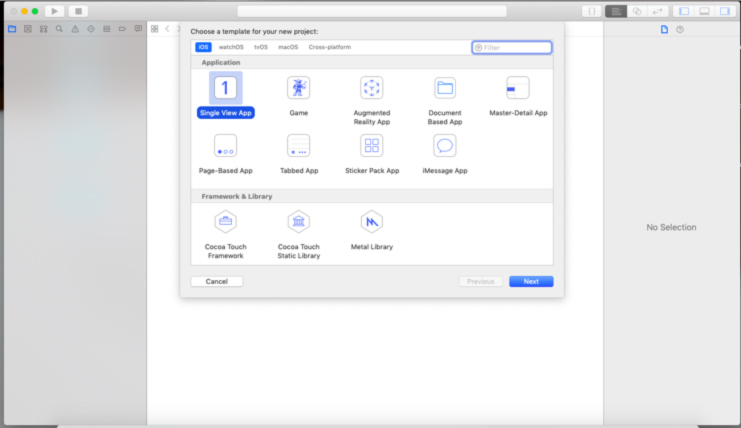
Always choose “Single View Application” for our iOS Application Development. And display another different type of template which chooses for other types of apple technology.
Now select “Single View App” template and click the Next button.
Step 3: Project Detail screen

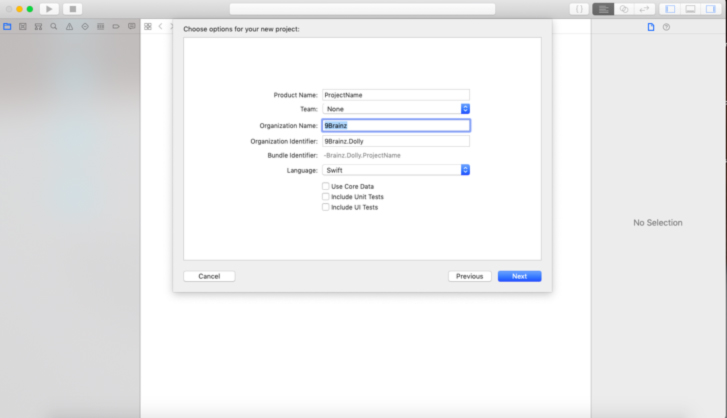
As per this screen, you must fill all the data which are related to your project.
Add your project name in product name fill, team by default None which is no need to change, add Organization Name, create an organization identifier, Bundle identifier create automatically. Bundle identifier is most important for your project. Xcode editor supports two type of language Swift and Objective-c, we can choose a language for our project. Now click “Next” and select destination path for the project and finally create your project.
Step 4: Project Directory

In your MacBook project directory look like. For opening Xcode project always double click on “.xcodeproj” file.
Contact us; If you have any query regarding iOS Application / Apple Watch Application / iMessage Extension / Today’s Extension OR you have your own application idea let us know. We have expert iOS team for your help.


